If you wanted to know how to take photos of the Milky way on your smartphone or mobile phone this guide is designed to help. You do that, I also have a video which shows you the process outlined here. I’ll embed the video at the bottom of the post.
Goal:
The goal was to take a Milkway or Astro photography on a Smart phone
So I decided to document and share the process and the tools/techniques I used to create these milkyway shots on the Samsung Galaxy S20 Ultra. The theory I had was with the larger 108 MP sensor using 9 pixels as one to give a 12MP DNG file plus the pro mode having up to 30 secs I should be able to capture a milky way shot that I could shoot edit and post from the phone!
Summary:
We need to plan for the right conditions and bring with us a way to mount the phone so it wont move and then the necessary items to help us make a interesting composition! If your not comfortable using the Pro Mode you might want to have a play with it before heading out, Also if your not sure why your shooting in DNG/RAW mode your welcome to read my post on Whats the difference between JPG and RAW
Steps:
Planning:
The first thing I did was go out and test in pretty average conditions but I could see the potential and it meant that with the right conditions it was going to work quite well.
- Minimum Light pollution (Given the current situation in the world my options were limited)
- Clear skies (Weather dependant however I did choose coastal locations which are not ideal due to ocean spray, Anything in the air that can reflect light or diffuse the light from the stars isn’t perfect)
- No Moon (Not having a moon is another form of light pollution so I used the Photo Pills Mobile phone app to plan a night where i knew the milky way was out and the moon had not risen yet.
- Planning App – Photopills can take a bit to get used to but basically you can work out the “moon” position and then on that date bring up the “augmented” reality view to see where the Milky-way will be on that date, you can also enable showing the milky way on the Planner “google maps” style view which shows the core of the milky way. Understanding these elements is the different between a lot of time saved guessing as well as planning really unique compositions. As it was my first time trying this I arrived about 1 hours too early and used that time to practice and use the Augmented reality view to predict and plan where my shot will be.
Gear:
- Tripod: The most important tool is a Tripod than can hold your phone, I’m currently using the Sirui T-024SK but any good tripod will do.
- Tripod Phone Mount: I personally am now using a Sunway Mobile phone holder which I really can recommend enough. It can naively mount in most Arca style tripods or has screw holes 1/4″ and 3/8″ to support base plates or direct mounts.
- Optional Spare Phone: I actually have a second phone which becomes useful in the “Bonus tip” section below.
- Battery Bank: Using your phone a lot can mean you run out of battery faster so ensure your phone is charged and bring a fast charging battery bank just in case.!
- Storage: Check you have space on your phone! If you have a Samsung that supports a Micro SD then you can move files to that to clear up space but the Pro Mode will usually save files to the Main phone storage.
Settings:
- Focus: I used the manual focus option which has focus peaking and set it to the “foreground” position (where I was going to stand/sit)
- Shutter: I put the S20 Ultra into “Pro” Photo Mode and ensured the “DNG (Raw)” option was enabled. As the stars move in the night sky I found the 15 second Shutter speed to be optimal.
- ISO: I experimented with this a bit finding that ISO 200 to 320 seemed to give the best results but I feel i could have gone slightly higher.
- Aperture: This is fixed open at 1.8
- Lens: the 7mm lens is the only option in the pro mode, the wider you can go the longer you can have your shutter speed.
- White Balance: You don’t need to set this as we are shooting RAW/DNG but if you want to you can set it to get a feel for the image.
- Timer: Set your count down timer to at least 2 seconds to avoid bumping the phone when its being captured. the more complex your setup the more time you want to have counting down.
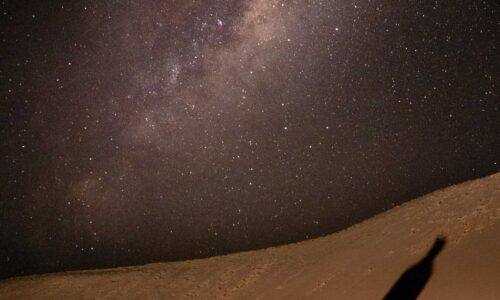
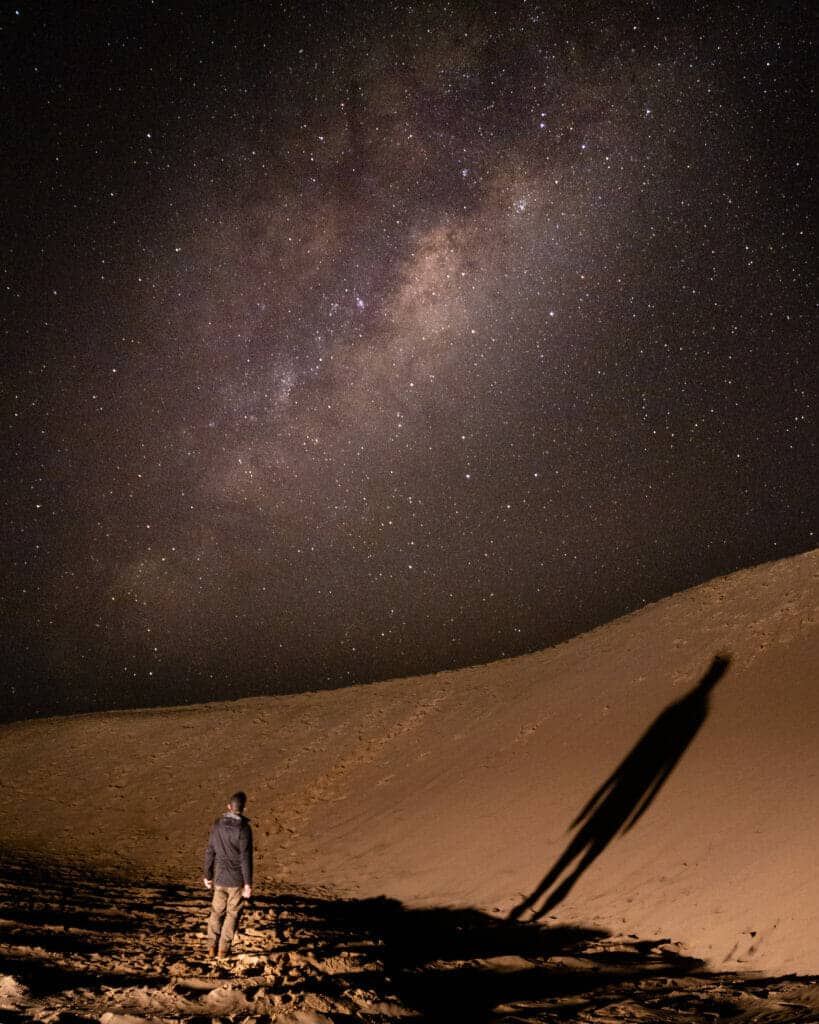
Composition:
By this stage you should have your camera setup, and the milky-way in a position in the sky, the next part is to put yourself in the shot, marking the ground and maybe hiding a headlamp nearby so you have light on you. If your not alone a friend can turn the light on and off while you stand still to get the right amount of exposure, if your by yourself and the light can’t Dim you can bounce it off things or move it further away to reduce the brightness, for me i used a headlamp on the dimmest setting.
- Person illuminated by a light.
- Subject might be looking up toward the milky way.
- To get the detail in the milky way you do not want to use the camera settings to mark it darker so change the way the “subject” is illuminated to get the right exposure on them.
Remember the stars move ! so be prepared to tweak your setup and use the Photo Pills Augmented Reality mode to predict which way the milky-way core will go and even if the moon will make a sneaky appearance.
Processing:
- Once your image is captured you may want to open it up in Adobe Lightroom CC on the phone or Snapseed, VSCO etc (Editor that supports DNG) to check the detail in the DNG file, don’t be fooled out in the darkness it might appear brighter or darker than you need to if you know how use your histogram and be sure to check your screen brightness as you may have turned it down or it may have automatically dimmed due to the darkeness.
- Practice playing with the settings so you can test if the ISO is ok, you do not want too much noise but the night sky can be very forgiving here.
- Selective Radial Edit: A good idea is to setup the base setting for your overall image then put a selective radial edit over the milky way.
- White Balance: As you were shooting a DNG file you also may not have set the white balance of the image, with your radial edit you may want to modify the white balance to make it sand out a bit, I usually add a sight magenta.
- To see a Speed edit I I have one on my IGTV so you can get a “feel” for the type of things you can do to help the core of the milky way pop out.
Lessons:
Each time you go out you will learn something new so be prepared for failures, it could be settings or subject, forgetting to bring something or running out of storage, so have your own checklist and take a few mins to think them through before leaving home! A great idea is to setup a Test from home before you go!
Bonus Tips:
You can use an Intervalometer to continually take photos for a timelapse or just to use to trigger photos so you can walk away from the camera further than the 10 second timer will allow 🙂
Mobile Remote Control Software : I’ve been using Teamviewer when taking photos on my phone to control it from far away (Via 4G/Data) This allows me to check the composition and trigger the shot. (Warning any program that allows remote control of your phone should be used thoughtfully, perhaps remove it when your done to avoid any issues, but this for me has been an invaluable tool especially shooting alone. You will setup the “Host” on the phone you want to control and the “remote” app on the phone that will be controlling.


